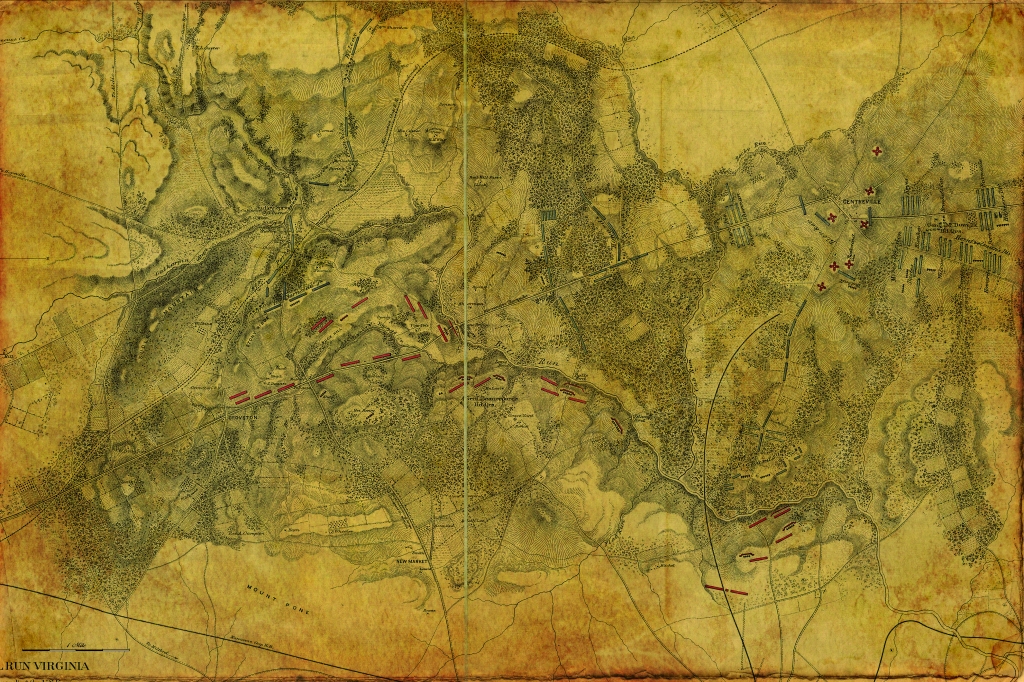
Actual historical map of Manassas Junction.Pub Battles “game board,” the actual Manassas scenario map!
Ever since I had first started playing wargames (starting with Tactics II in the early seventies) I had this dream of sitting around an oaken table, in a high back leathern chair, situated in a grand library, with a crackling fireplace. Before me would be a map, with blocks for the army units.
This is Pub Battles. In my imagination; I’m in the command tent sending out orders (moving my units) and receiving reports (resolving combat). The chit draw simulates the success, or failure, of my officers to carry out my desires, along with any number of an incalculable happenstances that may thwart or augment my plans. All this from a system that is Boom Simple!
I would look at military atlases that had maps like the one above, and despair that I couldn’t play a game that looked like that. When I looked through the available games, the gameboard was always covered with all sorts of “game” information. I am an avid wargamer, and I have always enjoyed hex and counter wargames, and took it as granted that a game would need all sorts of game information on the mapboard. I had shelved my fantasy of simply playing on a map.
I have also enjoyed miniatures, they’re great, both the rules and the aesthetic of 3D troops and terrain. I did tire of spending much more time painting figures, than I ever did playing the game. The hours painting/playing ratio finally drove me to distraction. And it took up so much space, both storing and playing. All the while, there was still that nagging desire to just “Play the Map.”
Then one day I saw a game simulating the battle of Brandywine. This game was played on a canvas map with wooden blocks. I was so excited, I had to have it. I didn’t even care about the rules. I would make it work. It looked exactly like what I had been dreaming about all these years.
When I got the game, I was amazed at how beautiful it was. This is a little surprising, since my expectations were so high. Then I read the rules, and they were boom simple. Like many simple games, if they are done right, the challenge is in the strategy. It did take me awhile to wrap my head around the Pub Battles system, I had a lot of baggage from other systems that I had to unlearn before I could truly see and appreciate the rules. Here is my post for veteran gamers who may be having the same experience.
Once I figured out how boom simple it was, I have had a game of it setup and playing almost constantly (over seven years)! Yeah, I’m that guy.
It is possible to have an experience very close to actual Kriegspiel with Musket Battles.
One of the coolest ways to play Musket Battles is by mobile (cell phone, here in the US), or e-mail.
In its simplest form, it requires 3 people. Two players, who only need the orders maps available form the Command Post Games Website, and a Ref with a copy of the scenario. All must have mobiles. The players can each be in some remote location, at least a few barstools away, but they only need to be in cellular contact with the Ref (each could be a continent away). Actually, they could be sitting across from each other, having a convivial good time and sharing a drink. The players each draw their orders on their map, and text a pic to the ref.
The ref has the game set before him and plays the turn (the chit draw, including Alter Turn Order rolls, moves, and resolves combat). Next, after-action reports are texted to each player. The reports should not include any gamey descriptions or info! Authentic sounding reports from the field commanders are what is wanted. The reports should be addressed from the field commanders (the ref) to their Commanding Army General (players).
Of course they will contain the results of combat, but they should also contain various intel as it becomes available. Things like “dragoons spotted SW of Gettysburg.” Or “Large secesh column moving East along Baltimore Pike.” My only words of advice are that the intel should all be accurate, if not overly detailed. The players are pretty much in the dark anyway, and adding inaccurate, missing, or lost, reports, will really gum up the works. It might be historically accurate, but this way is hard enough, without adding distractions. Maybe very experienced players would enjoy the confusion, but even they will find too much ruining the experience.
Players themselves should be encouraged to add scouting notes like “Sending Dragoons West of Street Road to watch for enemy movement.” Remember that dragoons don’t have to follow orders, and can move independently. Unless they specify what the Dragoons are doing, the dragoons will follow orders! If they have no dragoons in their command, detachments may be sent up to 1/3 foot move beyond the LOA to scout. Remember to include the intel that such scouts obtain (their LOS). Once you have sent the text, give them ten minutes to send their orders back to you. You could make it less or more, but you have no control over how long it actually takes for the text or e-mail to appear. I wouldn’t go much longer than ten minutes, because 8 turns at ten minutes is 80 minutes for a game, and it will take the ref even longer to interpret the orders, play the turn, and send after-action reports back to the players. That’s three hours at least. This whole process could be done just as quickly with e-mail rather than texts, if that works better. Once players are comfortable with the process, you can cut the turn around time to two minutes. Larger scenarios with many Corps might require extra time!
The coolest part: Each turn, the ref should take a picture before combat is resolved, and after combat is resolved. After the game the ref sends the pictures to both players as a group text. Nothing is more fascinating than to compare what you were picturing the battle looking like, and what was actually happening!
Playing in public has the added advantage of inviting kibitzers who might be intrigued, and possibly adding interested folks.
Ultimately, players don’t really need to know how to play, they just need to know how to draw orders on the map. In fact, not knowing the details of the mechanics creates a more authentic experience for the players. They won’t be thinking in game terms, their entire experience is authentic.
When you draw a chit, You may move your blocks, keeping the same facing (following orders). If you want to change facing (issue new orders), the HQ must flip to spent. When you are done moving the first block, its new facing indicates the new orders, and any block you move after that must end with the same facing.
You may refuse the flanks at the ends of your line.
When you attack, your block must be following orders (facing the right way) when it contacts the defending block, then you may have to adjust it to conform to the defender’s facing. You must always conform to defenders facing, and this facing change is free.
Your blocks in Road Column follow roads. Entering or leaving a road counts as changing the command’s facing, and requires issuing new orders.
You may rotate artillery to fire without changing orders.
Overlapping A block in end to end contact with a block in combat gives that block advantage if it is not in contact with an enemy block.
Wayne is overlapping the 71st. Muhlenburg gains an advantaged die!
Two such blocks grant an additional advantage. In the event a block has two, or more, favorable advantages than the defender, the defender uses a disadvantaged die and the attacker uses the advantaged die.
This is my quick and dirty solo variant for playing Musket Battles solo. I call it a variant because it is not intended to replace the 4.0 rules as printed, only to smooth playability for me when playing solo and/or recording videos. All 4.0 rules are used, except as modified below.
Combat is resolved completely, one defending block at a time, in the order chosen by the tactically dominant Army. If multiple blocks are flanking a single defender, the attacker chooses which block is the primary block, its modifiers are used, and all hits are applied to it.
Flank attack bonuses are applied for multiple attackers, as well as individual attacks to the rear. A single attacking block to the flank does not grant a bonus IV die, but the defender must use a II die (firing from the flank).
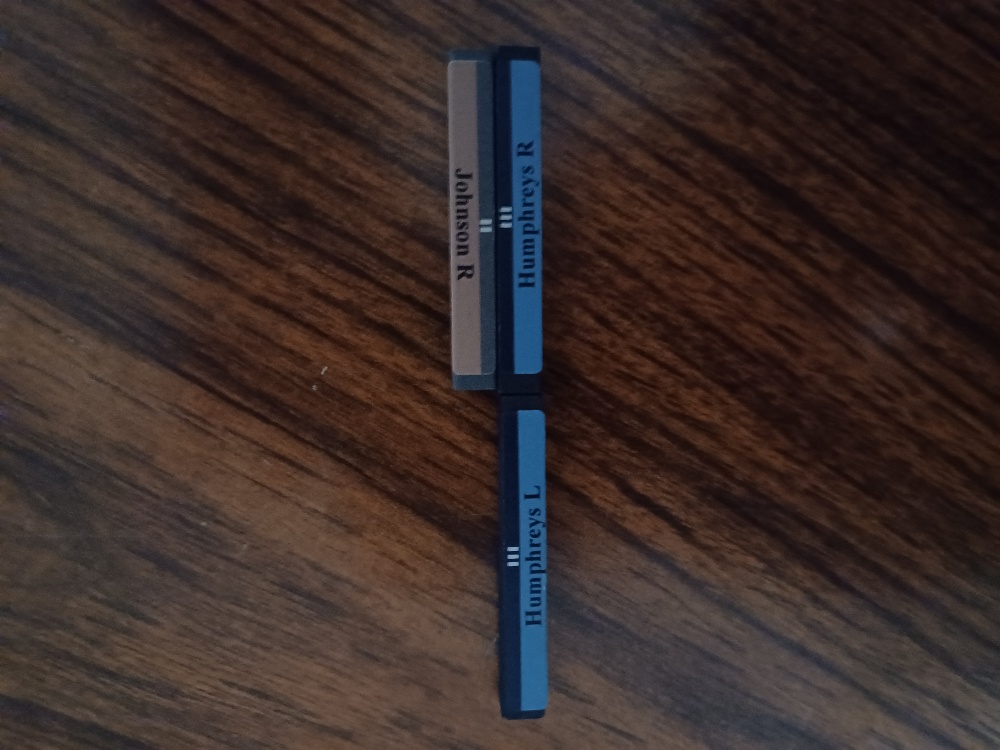
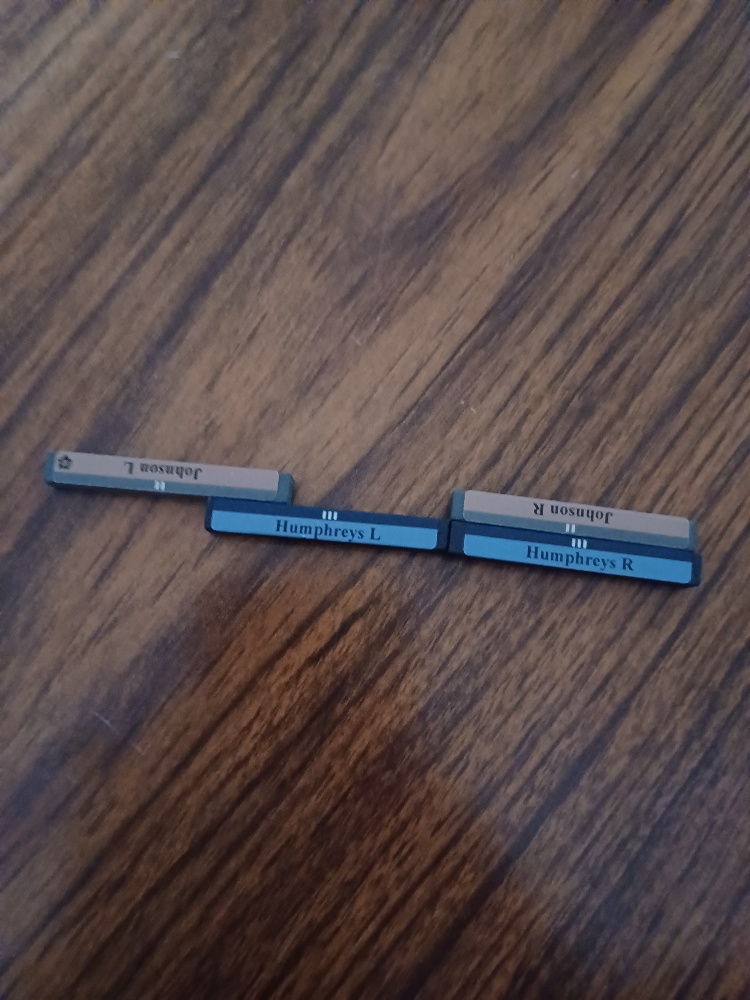
New Concept–Partial flank If a combatant has a friendly block in side to side contact (length ways), and that block is not contacted by an enemy block, then it is considered a partial flank and the block uses a IV die in combat.
Johnson is partially flanked. Humphreys R uses the IV die. Note: it does not matter if attacking or defending.Humphreys L cannot partially flank, it must square up with Johnson L!
Note that a block may not pass by an enemy block by claiming to only occupy half the area, that is only for moving past terrain!
Note that it does not matter if multiple blocks are flanking, other than it is that much herder to survive all the combats.
If a block ends its move in contact with the enemy, it is lined up with the enemy, the enemy block does not move.
A quicker and dirtier way to simulate orders.
A rough way to simulate the orders rules without the use of maps, if you want to get used to moving with orders limitations, is just to make all blocks end their move facing in the same direction. If you ever want to change this orientation (even if for just one block), you must flip your HQ to spent. If you roll to Alter Turn Order (thus flipping your HQ), you can not also change facing. There are two exceptions. 1) Dragoons may move independent of any facing restrictions. 2) Blocks that use the Charge rule may charge any enemy block.
The latest, and probably last, version of Pub Battles is now available. The name has been changed to Musket Battles, the 4.0 version of the rules is mostly the same, and now you can specify whether you want Divisional blocks (2″ wide) or Brigade (1″ wide) blocks. For all the latest news and info, check out my Facebook page “Musket Battles Fans.”
For the posts to long for Facebook, or possibly evolving, I will still use this blog format, with links from the Facebook page.
Here are the changes and updates to the rules that I have found so far:
Dangerous dice.
Upon review, I’ve noticed that the new dice are deadlier than the old method. Even if firing with disadvantage you have a pretty good chance of doing damage (1/3 miss, 1/3 hit, one third two hits). On the other hand, the only way to get 3 hits is to have advantage (1/6).
This should make combat much quicker. More combats with brigades, but fewer rounds of combat.
A unit with a flank attack (Charlie, take your brigade and sneak around the woods there, and hit’em right when we attack) can’t miss, does 2 hits 50% of the time, and has a 1/6 chance of dealing 3 hits.
In 4.0, “Ineffective” returns. A Command that has taken 50% losses can no longer rally.
This was in 2.x, but not 3.x. It was dropped because it rarely got remembered. It’s still a good rule.
Victory conditions don’t really change, but they are explained more fully. This is the same with night turns.
Finally, the Orders rules are included as optional, and are explained more clearly and succinctly.
4.0 has “bloated” from 8 to 10 pages. Roughly one page is the optional orders rules, and the rest is mostly taken up to explain rules more clearly, plus cool period art bits!
As stated in the rules, individual Baggage Trains now come on two blocks that must remain adjacent to each other. Think of them as flexing in the middle.
I had missed this, and was moving them around independently. This isn’t the case in Brandywine (they only use one block), but in Antietam every command with a Baggage Train, has two.
These guidelines are newly created and will be used for a series of videos. I will update it as playtesting necessitates.
1) Pick a map.
2) Pick the defenders LoC (must be a major road leading off an edge).
3) Pick two enemy armies, the larger number of blocks is the attacking army.
The defender may set up anywhere beyond one mounted move of the enemy’s edge.
The defender must prevent the attacker from being within command range of their LoC at the end of the day.
Either side may withhold any number of Corps (or individual dragoons) to enter on later turns (specify Corps and turn) as reinforcements. On the appropriate turn the chit is added to the cup. The enters on a road either on its own edge (E), or one of the side edges (S). The first reinforcement drawn from the cup enters by road along which ever edge was specified. Once a Corps enters on a side, that side becomes the edge that all friendly S Corps enter on, and any subsequent Enemy Commands with an S must enter on the opposite edge. A side without a road may not be selected. If no eligible side remains, the reinforcement must use its E side.
Variation: Meeting engagement. Both Armies armies enter on their home edge along one road on turn one in column, unless specified to enter later as a reinforcement.
Variation: Fog can be determined to reduce visibility to 1/3 foot move. If you want to use fog, roll a die each turn before the chit draw. If you roll the less than the turn number the fog clears. If a 5 or 6 is rolled on turn 1, there is no fog.
Note that this could create a very different Gettysburg, even if the historical Armies and home edges were used. Brandywine could find Washington on the Pratzen!
War Campaign: Play the same armies, keep track of victories. Play 5 battles. After the first battle, the winner of the previous battle is the attacker. If the defender is a larger army by number of non HQ and detachment blocks, it must remove complete HQs until it has the smaller force.
Even if you own just one scenario and map, this should provide numerous variations.
Let me know what you think, or if you think I have missed something!
Pub Battles is experimenting with new terrain rules. There is no longer a one third movement reduction for entering cover. Terrain effects on combat and LOS have not changed, and road movement rates still apply.
Kriegspiel, from which Pub Battles was modeled, does not use varied terrain costs. It was felt unnecessary.
Once again, in Pub Battles the chit draw moderates everything. Are you racing your opponent to a a critical point on the map? You are not moving a squad of men across a street, you are ordering 4-6,000 men, horses, and equipment, over a mile across uncertain terrain with unknown enemy countermoves. Yes, terrain will factor into the equation of how far the block of troops can move, but it is only one of many limiting factors.
Are the orders clear and understood? What if there are considerations or recent developments the commander was unaware of? What if there is some terrain obstruction that does not appear on any map? What if a nearby enemy formation gets the jump on you? How will you react?
How can a playable game possibly model all of those circumstances? Does it make sense to pick out one factor (terrain) and make it the only consideration? Terrain is often selected because it is the most obvious, but does that make it best?
I submit that the chit draw does a better job of regulating movement and maneuver between two armies. Of course, all this discussion is merely discussion. How does it play?
When Command Post Games first asked me to play test this, I thought “What the hey? No way! This won’t work! “Try it” they said. So I tried it.
Having played many games this way, I can assert with confidence that it plays more smoothly, allows more maneuvering, and that it doesn’t “break” anything. Switching formations in and out of march column, as well as changing facing, still costs the same. A block still has to be within command range if it wishes to contact an enemy block. All you are really gaining is an additional third in most situations, yet I feel as if the training wheels have been taken off. Without this change, terrain and maneuver players are often reduced to moving one third of a movement stick. Now I call playing that way “The Battle of Molasses”
Austerlitz, that amazing Napoleonic victory, is a fraught endeavor to simulate in a game because the whole battle is predicated on a deception, without which the battle would never have occurred. Napoleon needed to convince the Coalition forces that he was weaker than he was so they would leave their secure position on the Pratzen and attack, wherein he could descend with his actual force at hand and defeat them.
As the Coalition forces player, you know the truth of the matter, and you are not going to be fooled this time. The trick as a game designer is how to simulate this deception. As a soloist, this is an even trickier problem. The simplest solution is to play as if the coalition thought they were facing a much smaller force, until the jig is up, and then you have them scramble to react to the full strength force. This is actually entirely satisfactory, and fun. But it leaves out the feel of the historical battle, and Pub Battles is all about the feel of the battle. How did it feel to be the Coalition command staff, and not know what you were facing?
The Published version of Austerlitz works well for 2 players and teams, what I am suggesting here is for solo play specifically, but it works for 2 player games as well.
I came up with a solution for myself playing solo, but in the process I came up with a solution for competitive play as well. Here’s how:
Neither side knows Napoleon’s real strength until it’s too late. In order to win, Napoleon must play as if he has his full strength, and the Coalition must play as if he does not! This is done by not determining if Napoleon’s full strength is present until the optional troops are within LOS of coalition forces. In that moment a die is rolled, and on a 3 or less his full strength is present, otherwise only Lannes and Soult are there.
As per the Published scenario rules, if Napoleon has his full strength, the Coalition wins a draw. Conversely, if the French only have Soult and Lannes’ Corps present, the French win a draw. In either event, one side must win, or they lose, there is no final draw result. From the very beginning, both sides are in it to win it.
The Fog of Austerlitz — One of the reasons that this works as well as it does is that a thick fog covered the battlefield all morning reducing visibility to one third of a foot move. This allows the French forces to hid their true strength much more easily. In fact, it is an interesting problem for the French. Do they reveal their strength early so they know what kind of battle they are fighting, or hold off until the last moment and get maximum advantage from the reveal, whatever may be?
With the Orders Rules — I’m playing with the Beta orders rules. The essential thing you need to know for this battle is that to change orders requires a successful command roll. That means you roll equal to or less than your command rating. For the French it is 4, and for the Coalition it is 2. A 4 command rating means that you’ll succeed two thirds of the time, and a 2 command rating means you’ll fail two thirds of the time.
This means that it is harder for the Coalition to change their orders, and much easier for the French. This means the French can issue orders that might need to be changed with little concern, whilst the Coalition army is going to have problems deviating from the initial plan.
You can imagine how these two armies feel very different to command at Austerlitz!
Pub Battles let’s you make all the fun and interesting decisions, while the system manages the endless minutia.
Pub Battles is so simple on the surface, that it seems to scream for more detailed rules. What I invariably found when I tried many of them out, was that rather than improving the game, they usually just slowed it down and didn’t improve it much.
What I include here is those few that add to the flavor of command, yet don’t load it down with endless details:
American Revolution – Light and Militia units are the only units not Spent in woods. All others are. All units get Cover. No Rally in Woods.
Napoleonic – Light and Militia units are the only units not Spent in woods. All other infantry are. No Cavalry or Artillery in Woods. All infantry get Cover in woods. No Rally in Woods.
Civil War – No units are Spent in Woods. All units get Cover. No rally in Woods.
Buildings:
American Revolution – Light and Militia units are the only units not Spent in Buildings. All others are. All units get Cover. No Rally in Buildings.
Napoleonic – No Infantry are Spent in Buildings. Cover for all Infantry. No rally for all Infantry. Artillery and Cavalry cannot enter.
Civil War – All are Spent. All get Cover. No Rally.
These little touches add a degree of historical flavor with no real rules overhead.
Blocks in European (Napoleonic) Buildings are never considered flanked.
There is no terrain cost to move.
Unsupported foot being attacked by mounted is eliminated if it must retreat.
Leadership Rule: A Corps HQ block may be positioned on top of a block to show that the block is being led personally by the Corps commander. A militia block is treated as line, a line block is treated as elite. An elite block is still treated as elite. In addition, if such a block receives 3 hits, the HQ absorbs one of the hits, and the HQ is eliminated, the two remaining hits are applied with this rule in effect. Thereafter, the Corps has no HQ and can only receive command from the Army HQ (or any HQ if Confederate).
This rule is for fun and color, and should be considered optional!
Troops of the period liked being in cover, but it was hard to exercise command and control over troops that weren’t out in the open where their officers could see them!
Most Buildings in the European theaters were stone, and towns usually had significant stone walls.
True to its central goal of being command focused, Pub Battles handles forts with great simplicity, they count as cover and can’t be flanked. Boom simple.
What if we took this a little further though, and added just a tweak?
First, a slight differentiation. Forts and Improved Positions. Improved Positions are linear, like ACW hasty works. Great versus direct assaults, but vulnerable to flanking efforts.
In true Pub Battles fashion, I wanted this to be more nuanced than a simple die modifier. I also want it to be easy to grasp. So here goes:
Forts: cover, no flanking, ignore retreat, ignore first hit.
Improved Positions: ignore retreat, ignore first hit.
Together, they are referred to as Fortifications.
Forts count as cover and can’t be flanked, same as before. Additionally, blocks in forts ignore retreat results, and ignore the first hit.
Improved Positions don’t count as cover unless they are in cover already, and they can be flanked.
Ignoring retreat results means that the hit counts as a step towards elimination, but the block doesn’t actually have to retreat.
Ignoring the first hit stacks with Elite and Militia, which means elite ignore the first two hits, and when fresh Militia suffer a hit, they ignore the retreat result.
When spent units receive a single hit, they ignore the retreat. Two hits will eliminate a spent Militia, the first hit is absorbed by the Fortifications, the second hit is the first hit the unit suffers so counts as two hits, thus eliminating it.
Due to the temporary nature of Improved Positions, I use the wooden Pub Battles bases available from TREGames. You may also have seen these used for denoting march column status in my videos. Currently, due to the experimental nature of these rules, they aren’t used in any Pub Battles scenarios, but if you DIY any late ACW battles, they would be highly appropriate.
Actual Forts could be used in any current scenarios that use Forts, Like Hougomont in the Waterloo scenario, or any European walled town.
One of the generally accepted issues with any wargame is that players have far more control over their troops than their historical counterparts could ever have dreamt of having. It is also a corollary that the best part of playing a wargame is having that control, as opposed to being a mere kibitzer.
Having said that, wouldn’t it be fun if you had a game that let you write your orders and then sit back and watch while the battle was fought, just to see how it all fell out. One can easily imagine a computer game doing this. Back in the seventies, when I was in High School, there was a text based ACW program where you were given money to buy ammo, food, and supplies for your army for a particular battle, and then, based on how you allocated that, the computer printed out the results of the battle.
That would hardly pass as a fun simulation today, but what if you had an animated battle game, where the units followed your orders and you sat back and watched how it all fell out. You could try to issue new orders during the battle, but as history has shown, that is a fraught endeavor, indeed!
I believe this can be done with Pub Battles. In place of orders written, sent, and received, the provence of true Kriegspiel, I offer a simple limited order system that removes one from the too immediate control of individual units and blocks. It requires one to have a plan and stick to it for the best chance of success, and it properly distances one from too much micromanagement. In keeping with the Pub Battles philosophy, I started with a system full of all the details I wanted to incorporate, and then I pared back to everything but the most essential. Rather than trying to see how much detail I could cram into the system, I wanted to see how few could actually accomplish the task.
It Works Like This…
Issue orders – When the Army Commander is activated, they may issue as many orders as their command rating. Write a number next to the HQ on the orders sheet. Place a die with that number on the map, this becomes the Objective.
Receive Orders – When drawn, the HQ then makes a command roll, if the die is less than or equal to the command rating, the issued orders are circled and considered received, and must now be executed. If the die roll is over the command rating the order is not received and the die roll must be attempted the following turn, until received or countermanded. The unit continues to execute the last received orders.
At the beginning of the scenario, or when entering as reinforcements on later turns, all HQs automatically receive orders.
Execute Orders – If a block moves, it must end its move closer to the Objective, unless it ends its move within command range of the objective. As per the rules (page 3), to be within command range, a unit need only be touching the edge of the range.
No Orders – A block with no orders to execute cannot move, except to retreat from combat (even voluntarily). Blocks may always rotate.
Spent Blocks – A spent block may always treat the nearest unpacked bags as its objective. Note that if it has no other objective, it will be without orders once it rallies.
Range effects on orders – HQs adjacent to the Army Commander automatically receive their orders without need for a die roll. HQs over one mounted move from the Army Commander must add 1 to their die roll.
Countermanded Orders – Once orders are sent, they remain on the order sheet until received. If a new order is sent, it will remain in queue. There is no upper limit to the number of orders in queue. Each turn the HQ must make command rolls for all orders in queue, in the order sent. The last received order in the Queue is Executed. Once received, all earlier orders are ignored (no need to roll to receive).
HQ Support – An HQ may be ordered to support another HQ. Simply write S(HQ) indicating which HQ to support. An HQ that is given a support order follows the same process as an HQ given new orders. Once the order is received, that HQ’s orders become whatever the orders are for the HQ it is supporting. Remove its chit from the cup, it now activates when the other HQ is drawn. The only functional distinction it retains in game terms is that it is still required for command control for its blocks. New orders may be sent to it, and rolled to receive when it is activated. If it receives new orders it immediately reverts to its own command, and its chit is placed back in the cup at the end of the turn, it does not move with the other command, and is treated as having no orders until drawn next turn!
Blocks from different commands may not attack the same defender, without a support order.
Defending blocks do not require an HQsupport order to support one another. Note that HQSupport is different from the support rules on page 4 of the 3.2 rules. Essentially, HQ Support is a concern primarily for attacking units, although being able to activate the same time as other defenders with the same order can be very useful.
Bombardment, since it requires no movement, does not require orders!
Discussion
The intent of these rules is not to exactly duplicate written orders. The intent is to provide a simple system to simulate the feeling of only possessing indirect control. Of seeing events happening on the battlefield that are beyond your immediate control. You cannot simply reach down like a Greek God to control the actions of the mere mortals, you can only hope and plan.
Since your opponent has no idea which of your commands is tied to which die, or how many may be tied to any particular die, there is some FoW inherent right away. Pub Battles primarily simulates FoW with the chit draw.
I intend to replace the dice with flat markers of some kind, as the dice get in the way.
The issues of lost or misunderstanding, or need for confirmation, are all simulated with the die roll to Receive.
It may seem ideal to use HQ Support to combine many commands whenever possible. This has its down sides though. The Objective is only Command range from its point on the map. Condensing your forces pretty much tips your hand and declares “I am going here!” This allows your opponent the option of allocating just enough strength to hold up your main effort long enough to strike somewhere else.
Combining against a defender is the surest way to succeed, if you can get away with it!


You must be logged in to post a comment.