
In this battle, the Queen’s Rangers went out on a wide flanking move and were not heard from the entire battle, nevertheless, their mere threat weighed on the Colonials minds as they kept their Baggage Trains close!
Author: Mr. Q
I semi-retired at 47. I suffered a sever brain injury at 25. I have written 3 books about living with brain injury and have had a regular column in the Brain Injury Alliance of MN's quarterly mag since 1999. I received my BA in English with honors in 2014. One of my avocations is developing simulation games. Weather permitting, I enjoy a round of Disc Golf whenever possible.
Brandywine Austerlitz style
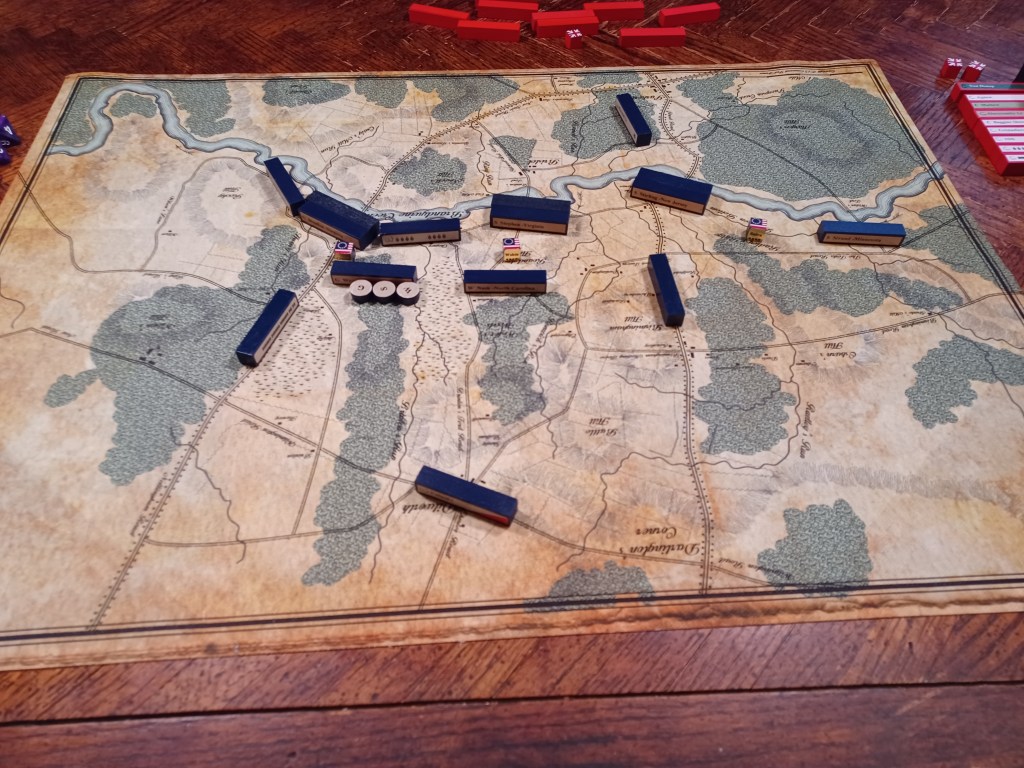
As I was setting up Brandywine this morning, I started thinking about how you could duplicate the colonial motivation for their historical, ultimately disastrous, defense. The proper way to think about it is, “Why wouldn’t the British do what they did historically.” In all my years of playing this Pub Battles scenario, I’ve never found any other entry point as successful, even if I “make” the Continentals react slowly. The British attacking across the Brandywine is the colonial hope, and attacking the other side from the historical, places you too far away for the short five turn game.
What would make Howe want to force a crossing of the Brandywine? Easier victory conditions. How might that work?
****************************************
If the British commands enter from the center, then they only need to be “Across the Brandywine” by the end of turn 8. “Across the Brandywine” means that there are no colonial troops within 1/3 of an infantry move of at least one of the five bridges. Regular victory conditions are also in effect.
Setup: Washington’s forces setup first, not closer than 1/3 foot move from any map edge.
Turn 1. One British command enters from the “Center” entry point. Note: Units may not enter in road column if this places them within 1/3 foot move of enemy forces!
Turn 2, or later. The other British command may enter from the same side as the first command.
Turn 4. If not entering earlier, the remaining British Command must enter from the Center, Left, or Right, map edge.
The British player must note secretly on paper when, and from what edge, the second command enters, before the Colonials have setup. If playing solitaire, choose a flank, and then roll randomly on turn 2 to see if the rest of the British show up then, or flank on turn 4.
****************************************
I’ll start trying to break this, to see if there is any “Sure” strategy. I’m wondering, if the British go all in on a certain crossing point, is it impossible to prevent their crossing? I am hoping that deception will play a key role in all games, are the British waiting until turn 4 to attack from the flank? Should we try to defend it? Given the possibilities, was Washington playing the only hand he had, historically? What if we used command cards? Howe and One other. Washington would need to dispatch troops to confirm the presence of the enemy on the flank! What would the British do if faced with a colonial setup of only 3 HQs?
An interesting experiment, if nothing else.
And here is my first playtest. I think this works pretty good!
Gettysburg Replay
Day 2 demo.
Antietam 1 Demo
My intent is to make a faster, clearer, demo video. Let me know what you think.
WIN a copy of ANTIETAM!
I didn’t know that if you ordered a paper map, it comes folded in a box. I had to get a copy and check it out. If you prefer to store your games on a shelf, and are willing to pay less 😀 for a less durable than canvas map, this could be a viable option.
Watch this video to enter the giveaway. Eligible comments must be left in the YouTube video comments!
Complexity does not equal Reality
I have come to believe that more complexity equals less realism. Whatever game I am playing, whomever I, as the player, am representing, has to feel authentic. Although I spent most of the late seventies and eighties looking over SL, and then ASL, boards I didn’t for a minute think that my grandfather would ever say, “Yeah, that’s what is was like!” Tactical games do require more complexity, but they don’t push my buttons anymore.
Strategic/operational games are what I like now, and I want a game that immerses me in the battle. Every time I have to stop to look up a rule, or consult charts, it lessens my enjoyment.
Ever since I was a young man, I imagined myself sitting around a large table with a glass of wine looking at a map with blocks, just the way the military atlases showed them. That’s all that there would be. No charts and tables, just the two of us looking at a map. Of course, in time I came to believe that was just a fantasy, and you needed hexes and game info on the map, charts and tables to regulate all the details. That was what wargaming was to me, and I enjoyed it immensely, but that dream was always there, in the back of my mind.
Then I found Pub Battles, and it was like a breath of fresh air. Boom Simple rules that capture the feel of command, all played out on a map with blocks. This may not be everyone’s cup of tea, but it is mine. Getting back to the rules question, I find most rules excessive and unnecessary. “Chrome” is the descriptor. The market demands that you have super detailed logistics and combat, weather and C3, all aimed at greater realism. I find such efforts to be mostly smoke and mirrors. I want a game that makes me feel like a commander issuing orders and awaiting reports, Actual commanders are very concerned about the minutia of leading an army, and that’s why they have staff officers. I just want to know that all those things are being handled, so I can focus on overall strategy, matching wits with my opponent.
Kriegspiel and Pub Battles
Kriegspiel has two views of a battle, the player’s and the ref’s. Pub Battles blends these two.
In Kriegspiel, the ref does all the heavy lifting, while the players…Play. Ultimately, it is the ref’s job to make sure the experience is as authentic as possible. What could this unit really do? Where could it get to, and how fast? What happens when it has combat?
In the player’s view, this is a very dull and technical job. That is the illusion the ref creates! The ref uses the technical data to weave together a plausible scenario, but he also has to create amazing and memorable stories, laced with unbelievable good luck along with the bad (in war, one side’s good luck is the other’s bad!).
In Pub Battles, the job of creating illusion is quite different. Both players know exactly what is what. They know the strength of the enemy, and where he is, and when his reinforcements are arriving. They know the condition of his units. They also know the same about their own armies, to a degree that historical commanders could only dream of.
Does this make Pub Battles a poor sister to the real show? Hardly. The source of the uncertainty is different, but the uncertainty is still very much there.
First there is the chit draw. Do you want to go first? If you are interested in taking a position, more than destroying the units there, you might, because then the defender might simply retreat to avoid combat, saving you a possible expensive and time consuming battle. On the other hand, if you’re trying to destroy the enemy forces, then you probably want to go last, so you can force your foe into at least one round of combat. As the defender, you have the same concerns, but from the other perspective.
Second is combat. On the surface, Pub Battles combat seems almost Yahtzee simple, but therein lies its real strength. Because it doesn’t try to simulate certain particular details, it encompasses many more. No matter what the result of any combat, there is a plausible explanation. It could be logistical, tactical, environmental, or just plain luck. There are enough factors, like cover, flanking, and troop quality, to give players a concrete basis in their strategy.
The takeaway point is that Pub Battles does a very good job of simulating the fog and chaos of battle, whether it’s teams of players, two players, or solo. Rather than a referee imagining all the details and spoon feeding them to you, you are free to imagine whatever seems right to you.
Some players like to look at the map and know that’s where the units are, exactly. More power to them, if that’s what they desire.
I prefer a more “Kriegspiel” frame of mind. In Kriegspiel, referees delight in misdirecting players, feeding them just enough bogus information to keep them guessing and on edge, this makes the game both fun and real. When I move my blocks across the Pub Battles map, I imagine that those are the orders I’m handing to my staff officers, who then race to get them to the Corps commanders. The chit draw reflects how successfully my intentions were able to be carried out. It’s all up in the air, I’m shooting arrows at noises in the dark, until I get reports coming back. That’s what the combat results are, the reports I hear from the front lines.
In the absence of precise information, the mind creates a plausible scenario. To some, all this fog is unsatisfying. They want to know exactly where everyone is, and what condition they are in, they want to know exactly what happened. I get that. The very real need to make sense out of things is exactly the itch that we all desire to scratch, and the teasing uncertainty is what makes things so interesting.
This makes Pub Battles my favorite game, whether I’m taking it to my FLGS to throw down with friends (a nice diversion), or I’m playing solo in my study (my preferred option).
2nd Second Bull Run: “I’ll expect you to beat them.” Playtest Demo
I chose this quote from Jackson to A.P. Hill, because it defines the Second Bull Run at all levels. Lee was expecting Jackson to beat them as well, and only reluctantly sent Longstreet back through the Manassas Gap at midday on the second day. This resulted in the Union rout and defeat only because Pope refused to believe that Longstreet was a threat until too late.
This is Day 1. Longstreet is pulled back behind Manassas Gap in the evening. On day 2 he can enjoy an easy victory if Jackson can hold out. If he chooses to rejoin the battle, then regular victory conditions apply.
And Now I have completed the Second Day. Spoiler Alert! Don’t read any further unless you want to see who wins before you see the video. I have amped up my editing game, and have managed to put together a quicker and clearer video! Only about 4 minutes of your life you’ll never get back!
This game features the first time I’ve video’d the second Day of the battle. This is where it gets really interesting and gives a unique feel because Lee must decide whether or not to bring Longstreet back through the Manassas Gap. He certainly doesn’t want to if he doesn’t have to, but if Jackson can’t hold out another day without Longstreet’s Corps…
If you want to recapture the Confederate success, just act like Pope, as though Longstreet skedaddled and ain’t ever coming back. Send everyone against Jackson, and totally ignore Longstreet. This is especially effective if the Union is already weakened from the first day’s fighting, and NEEDS to believe that Longstreet ain’t coming back.
Second Bull Run Development Update
I have been tasked with leading the creation and play testing of Pub Battles’ Second Battle of Bull Run. I wanted to share where this is at, so far.
The OB
Developing the Order of Battle for a Pub Battles scenario is, like almost every part of the Pub Battles design, a lot of work to create an otherwise simple appearance. Since every component has a lot of wiggle room (one infantry block can represent anywhere from 3000 – 6000+ troops) it would seem a quick task to whip something up.
Well, yes and no.
It is relatively straightforward to fit the general numbers with the blocks. The trick is coming up with the right feel. You start with a Corps, everything is based off the Corps. How many troops did the Corps have at the battle? When might the disparate parts of the Corps gel into the whole? Where were they, and where might they have been?
This is where it starts getting tricky. The Second Battle of Bull Run really began with skirmishing almost a week ahead of the final day of the battle. Most of that involved two armies groping around trying to find each other. This makes for an exciting refereed Kriegspiel game of cat and mouse, but so much can be arbitrary luck that two players might just as well guess and roll dice.
When to start?
Ultimately, after many fitful starts, it was decided to begin on the 29th of August, 1862. Everyone who could be there, was there. Players can then feed forces haphazardly into the fray while simultaneously trying to outmaneuver their opponent and gaining local numerical superiority, as Pope tried, very unsuccessfully, historically. Alternately, the Union can first gather into a coherent whole before attacking the foe they outnumber. Which is easy peasy IF Lee just sits there and patiently waits to become outnumbered.
Ah, suddenly we have a very interesting battle to recreate!
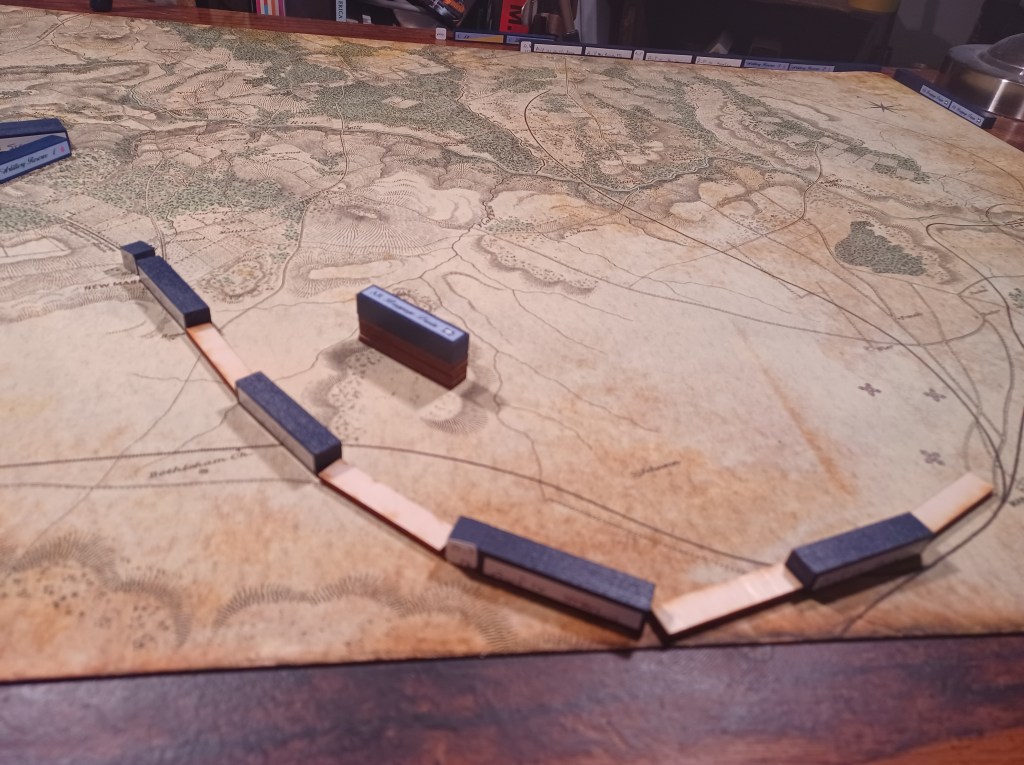
Jackson and Stuart begin on the map, West of the unconstructed railroad and South of Bull Run. Longstreet enters from the West on the Warrenton Turnpike. The Union player starts with up to 5 blocks on Henry Hill, and the rest of the army arrives from two points: From the East on the Warrenton Turnpike at Centerville, and from the South at Manassas Junction.
Strategy
This setup leaves the Union player with a lot of interesting alternatives. The Turnpike is a major road and allows the fastest entry, but it is faster yet to have some of the forces begin on the minor roads out of Manassas Junction. Also, if the Union player tries to have everybody use the same road, there are going to be traffic jams and pinch points. A Corps, or two, will very likely spend a turn or two, waiting for traffic to start moving.
By far the trickiest bit to recreate was the Union command confusion. The Union army would have been difficult to command for an able commander, with everyone working as a well oiled machine; historically, it was anything but.
It is never fun to be hemmed in by all the mishaps of one’s historical counterpart, at the same time, many battles wouldn’t have even been fought without them. This is what we have done so far, and it seems to be working quite well:
Two Corps are the original Army of Virginia under Pope’s command. Three Corps are newly added, grudgingly surrendered, Corps from McClellan’s Army of The Potomac. McClellan wanted Pope to fail so McClellan would be recalled to command of the Federal forces, and be hailed as the “Savior of the Republic!” New to the job, and having his fellow officer conspiring against him, may very well be the source of Pope’s timorous command style at Second Bull Run.
This means there are two Third Corps at Second Bull Run. The Army of the Potomac Corps still have that on their labels, to differentiate this “other” Army. Even though you have two different army labels, there is only one army, the Army of Virginia.
We have decided to incorporate the general confusion this whole mess created by first assigning all artillery, cavalry, and Baggage Trains directly to Pope, then having Pope only able to activate when one of the two chits Labeled “Army of Virginia” are drawn. He still commands all the HQs, but he only activates when either of two of the five Corps are drawn
In practice, this makes it very tough to coordinate the army as a coherent whole. It can be done, but it takes care, and is very fraught. This is exactly what we were looking for! The larger Union army is harder to maneuver into striking distance.
Conversely, if Lee just enters and turtles up on the Southwest corner waiting for Pope to exhaust himself attacking Jackson in frontal assaults, like he did historically, he is likely to be disappointed. The Southwest corner can be broken by carefully coordinated bombardments with superior numbers of artillery. Like always, Lee is facing a numerically superior foe, and must choose his ground wisely. With a map that covers over six square feet, Confederate players will have a lot of choices!
The obvious ideal choice is the Southwest corner, but much of this advantage is lost if your opponent knows that’s your plan. What merry chases will you have Jackson lead the Federal forces on?
The Feel
Having that question in mind, let us look at the flow of the battle. On the first day, one can generally expect lots of maneuvering to set the enemy up for their ultimate defeat on day two. This mimics the historic battle. Having laid out this general flow, the victory laurels will often rest on the player that deviates from the expected.
As always, with Pub Battles, the battle is fresh each time it is played, even if you follow the exact same battle plan, because the chit draw is different each time. I explain this fully in THIS POST.
New Rules
As always, we tirelessly work at even more elegant and simple rules to make the game as authentic as possible, while remaining Boom Simple!
Limited Rally Baggage Trains
Sometimes it seems a little too much when you hit a line turn after turn and the Unpacked Baggage Train rallies several spent units from a somehow unlimited supply.
Instead, what if a Baggage Train were limited to a certain number of rallies per game? We wondered what affect this might have, and after several games have found that four rallies gives the right feel (remember, Pub Battles is all about the feel).
This generally means that you can decimate the enemy, or have decimated your army, with an all out attack once or twice, and then your done. It gives a very authentic feel to managing your losses.
This is actually a two part rule change. The first part is that on a night turn, you recover all your lost blocks, except they all are placed in a spent condition, and just like you can’t move and rally in one turn, a block can’t rally the turn it is placed.
The second part is the four rally per Baggage Train limit.
This rule isn’t official yet, but I encourage you to try it out. You can keep track on a slip of paper, or with tooth picks, matchsticks, or dice placed by the Baggage Train block.
I like to use my 1/8″ wood bases that I also use as markers for road column. I remove a block for each rally.
If your block is marching on a major road, you place the base on top of the block. Many folks choose to play with miniatures, just using the rules and scaling their table to their preferred base size. If you want to base 5mm or smaller figures on a base appropriate to the canvass map, these are 1/8″ thick bases of the appropriate dimensions for the system. They are available from TRE GAMES INC @ $5 for 30. They have a lot of different size wood bases as well as scale terrain and models.
CODA
This project has taken over my life. It is so exciting to work on, and it feels really good when things just work. I started this project thinking “This’ll never work,” this battle isn’t really suitable for Pub Battles. Trial after trial, replay after replay, it was cool to see how well the system captured the feel of the greater battle. Now, I can’t even remember why I thought it wouldn’t work, it seems ideally suited!
Finally, when reading the histories of any conflict, they are mostly focused on much smaller units and actions; yet after playing the scenario, I could imagine those same actions as part of what “the game” was telling me as I played.
I should add that Second Bull Run is simply an add on to “Bull Run: The Big Skedaddle.” It uses the same map, you only buy the new blocks. A very economical way to get what is essentially, a whole new scenario. The map is the same, but very different troops fight a very different battle.
Coming soon! Subscribe to my blog and get a heads up when it is available.
Please share your enthusiasm and any concerns!
Experimental Baggage Train Rules
I think the addition of the Baggage Train rules in Pub Battles was one of those things that just “clicked,” and suddenly everything fell into place. Gone were the days of destroyed lines suddenly appearing as fresh a turn later. Gone also, were the days of grindy combat where it was near on impossible to eliminate 50% of the enemy’s infantry blocks.
The system could stop there and be fine. Which it has. But again, what if there were a simple mechanic for showing an upper limit to how much damage one Baggage Train could fix?
After much discussion with the folks at Command Post Games, I have come up with and tested a new Baggage Train rule. It is two part:
- During a night turn all blocks are recovered, but they begin as spent and may not be rallied that turn.
- Each unpacked Baggage Train may rally 4 blocks per game.
While this may seem like a simple rule, as in “How much work could that be?” Its evolution through many different suggestions, all of which start out much more complex, hides the effort required to distill a complex concept down to a simple, elegant rule, that does everything initially desired.
What this means is that even after a day of heavy fighting, an army can look pretty good by morning, but it is only an illusion. The troops will be more brittle, and your lines will begin to crack and fail if asked to do it all over again.
Even after rallying four blocks, your Baggage Trains will remain on the field of battle. All the infrastructure they represent will still be present (hospitals, food, pack animals and fodder, smithies, and everything else that keeps a mobile city of several thousand functional). They must still be protected, they still fulfill critical offices.
As always, this is NOT an official rule. Once in its final form it will need to be playtested for quite some time before you see it in an “official” format, which means whenever a new edition of the rules is made available.
Take for instance the number four. Three seems to be too few, and five seems too many, so we’re starting with four. Who knows? Maybe we’ll end up with seven, or one. I really think it will be four.
Down the road, with this tool in their design bag, we might see battles with one side having very tight belts, we might see fewer rallies with more Baggage Trains, or one gigantic Baggage Train. Anything is possible, but always, it must be Boom Simple!

You must be logged in to post a comment.